
Automatically Sync External Data to AutoCAD Plant 3D
How to set up an automatic sync that reads an Excel file, a SQLite database, a SQL Server connection, or an OData source and writes the mapped values into Plant 3D or AutoCAD properties on your objects.
What does automatic sync do?
This guide covers general Data Bridge synchronization: an external table or spreadsheet is mapped to Plant 3D or AutoCAD properties, and matching happens on ordinary conditions (e.g. TagNo = an external column name). If you instead need to inherit properties geometrically from a drawn Area object in a P&ID, see the separate P&ID Area Boxes guide — it covers the “Area (geometric)” source in depth.
Excel / SQLite / SQL Server / OData
TagNo = P-101, Descr = Centrifugal pump
External column TagNo = Plant 3D property TagNo?
Description ← Descr
Description = Centrifugal pump
It only writes ordinary, editable properties
Data Bridge writes to the object’s own Plant 3D or AutoCAD properties. Acquired, inherited, calculated, read-only, and tag-format-controlled fields can’t be updated this way, and nothing is written directly to the project database outside of Plant 3D’s own APIs.
Pick the right Data Bridge workflow first
Use this guide when a repeatable rule should copy data from an external table into many objects. Use Interactive lookup when a user should choose one source row for selected components. Use Area (geometric) when the object’s position inside a P&ID area — not an external key — decides the value.
Have this ready before setting up the sync
RKCadTools does not create Plant 3D classes or properties. The target fields need to already exist and be editable in the project’s class setup.

An Excel file, SQLite database, SQL Server connection, or OData feed you can read from during setup.

The Plant 3D or AutoCAD fields that should receive values need to be ordinary, editable fields — not acquired, inherited, or read-only.

A Plant 3D property and a column in the source that can be matched uniquely across both — e.g. TagNo or an item number.

Test the whole setup on a copy of the project before using it on the real one.
Never write directly to the project database
Data Bridge only writes through Plant 3D’s own property APIs. Don’t edit Plant 3D’s database files manually to “help” a sync along — that bypasses Plant 3D’s own data validation and can damage the project.
Setup, step by step
Safest first run
Start with one class, one unique key condition, and one harmless property on a copy of the project. Keep Skip sync preview dialog off. When Preview shows only the expected before → after changes, extend the mapping and then consider syncing on drawing open or save.
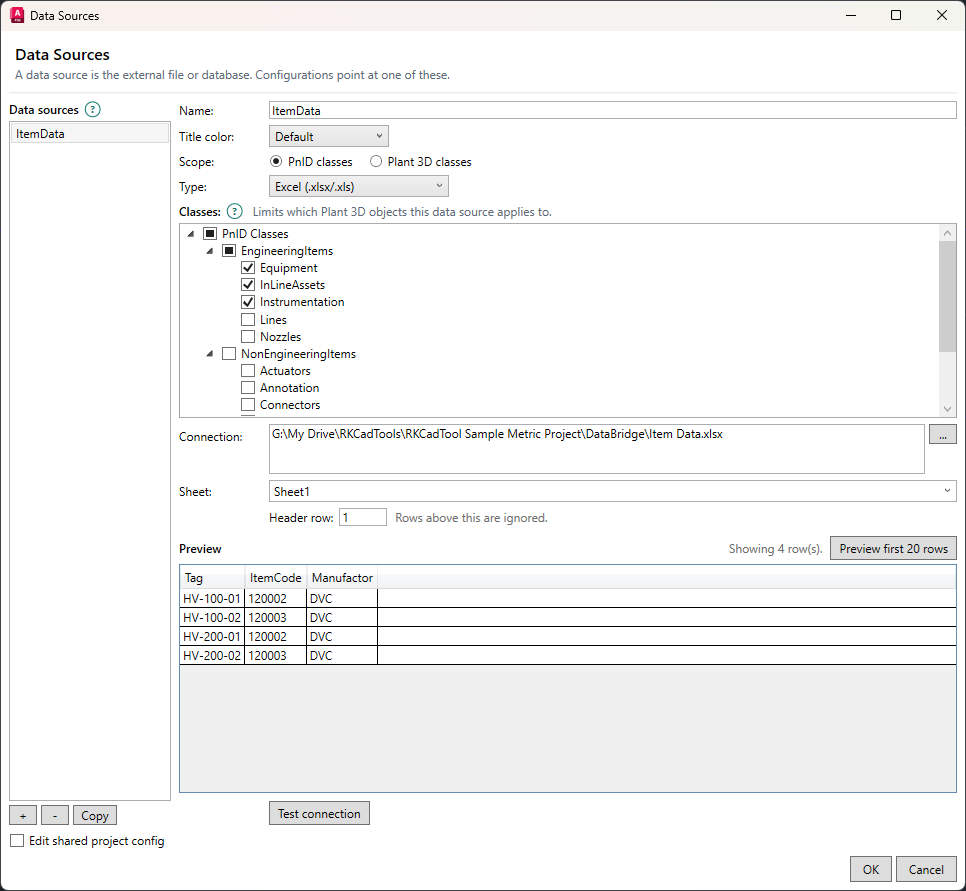
Create or select a data source
Open the RKCadTools tab → Data Bridge panel → Data Sources, or type P3DBRIDGE_DATASOURCES.
- Click + and give the source a clear name, e.g. Equipment list 2025.
- Select Scope: PnID classes for 2D schematic data, or Plant 3D classes for 3D piping/equipment data.
- Select Type: SQLite, Excel (.xlsx/.xls), SQL Server, or OData. (The Area (geometric) type belongs to the separate Area guide and isn’t used here.)
- Fill in Connection. The field accepts the variable
%General:Project_Path%for the project folder, and the … button can browse to a file. - For Excel: set Header row to the row number where the column headers are. Rows above it are ignored.
- Click Test connection, then select Table/View — the dropdown only fills in after a valid connection.
- Under Classes, check which Plant 3D/PnID classes the source applies to. Checking a parent node includes its subclasses.
- Use Preview first 20 rows to see the source’s actual column names and content before you map anything.
Create the configuration
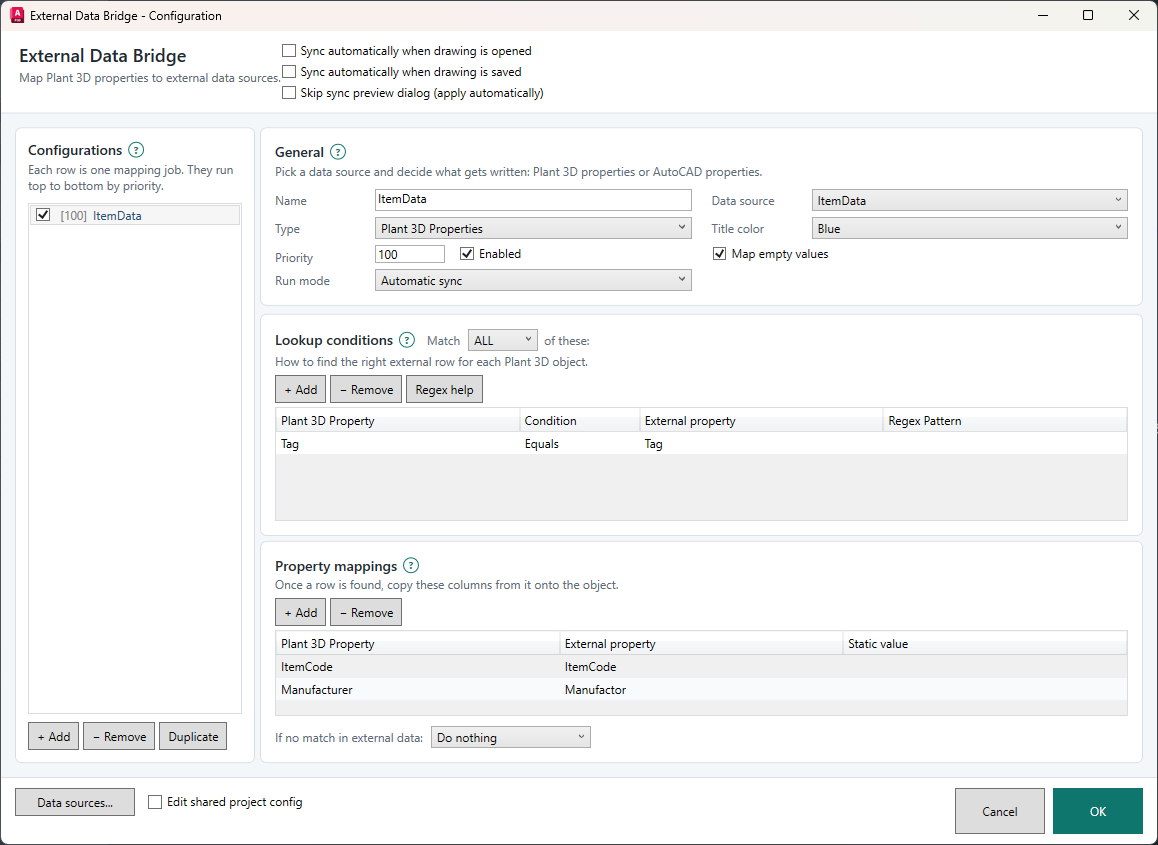
Open Setup in the Data Bridge panel, or type P3DBRIDGE_CONFIG.
- Click + Add under Configurations.
- Name the job, e.g. Equipment data from Excel.
- Select the data source you created in step 1 under Data source.
- Set Type to Plant 3D Properties (writes to PnP class data) or AutoCAD Properties (writes layer/color/linetype on the drawing entity itself).
- Leave Run mode on Automatic sync. Interactive lookup is a separate workflow (the
P3DBRIDGE_LOOKUPcommand) that only runs when a user manually picks an external row — it never takes part in automatic sync and isn’t covered by this guide. - Check Enabled. A configuration can be saved without running by clearing this checkbox — useful if it’s meant to be reused later.
- Set Priority. Lower numbers run first; ties are broken alphabetically by name.
Set conditions and match logic
Under Lookup conditions, add one row per condition that decides which external row matches each Plant 3D object.
| Plant 3D Property | Condition | External property |
|---|---|---|
| TagNo | Equals | TagNo |
- Click + Add for each condition.
- Choose a Condition: Equals matches against an external column. IsEmpty/IsNotEmpty and Regex/RegexNotMatch only test the object’s own property value and don’t look up the external source at all.
- With more than one condition, choose the logic: ALL requires every condition to match; ANY lets the first matching row win.
Tip: use the Regex help button in the dialog if you need to build a regex pattern for IsEmpty/Regex conditions.
Map external data to Plant 3D properties
Add one row per property under Property mappings. The left side is the field on the Plant 3D object; the middle is the column in the external source.
| Plant 3D Property | External property | Static value |
|---|---|---|
| Description | Descr | leave empty |
| DataSource | leave empty | Equipment list 2025 |
- Click + Add for each mapping.
- Select an editable target field in Plant 3D Property.
- Select the source’s column in External property, or type a fixed value in Static value — if Static value is filled in, External property is ignored for that row.
- Use the Map empty values checkbox to control whether empty external values should be written (clears the field) or skipped (keeps the existing value). Turned off, an existing Plant 3D/AutoCAD value is kept when the source’s field is empty.
- Under If no match in external data, choose: Do nothing keeps existing values on objects with no match; Clear values clears the mapped properties.
Only map to ordinary, editable properties. Acquired, inherited, calculated, read-only, and tag-format-controlled fields aren’t written.
Save and run a preview
- Click OK to save the configuration.
- Select Preview in the Data Bridge panel, or type
P3DBRIDGE_PREVIEW. - Review the before/after list in the preview window (see the next section for how to use it).
- Nothing is written until you accept and click Apply in that window.
Choose how syncing happens
At the top of the Setup window, you can set three independent checkboxes:
- Sync automatically when drawing is opened — runs all enabled configurations when a drawing is opened.
- Sync automatically when drawing is saved — runs them again every time the drawing is saved.
- Skip sync preview dialog (apply automatically) — off by default, so the review window always shows first. Turned on, Sync and Sync Open write all changes immediately with no review.
That last checkbox can also be toggled without opening Setup: the ribbon button Show Sync Preview (the P3DBRIDGE_TOGGLEPREVIEW command) flips the same setting and prints a confirmation on the command line.
Keep the preview dialog turned on until the setup has been validated on a representative slice of the project.
How to use the Sync Preview window
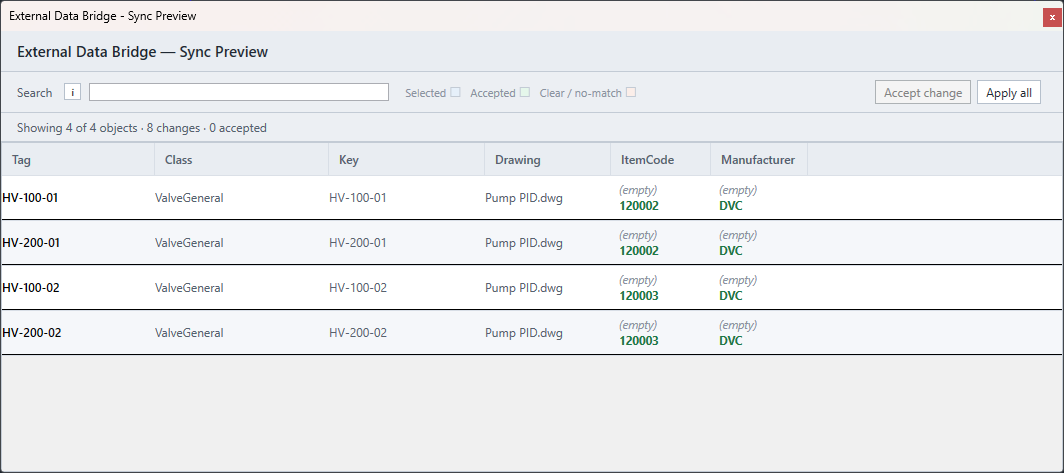
Both P3DBRIDGE_PREVIEW and a regular P3DBRIDGE_SYNC/P3DBRIDGE_SYNCOPEN (when preview isn’t turned off) open the same review window: External Data Bridge — Sync Preview. It always runs the sync itself as a “dry run” first, so nothing touches the drawing until you choose to apply it.
Review the grid
Each row is one object (Tag, Class, Key, and Drawing). The remaining columns are the properties that actually change, shown as old value → new value. Only objects with at least one change are shown. Objects where Clear values will clear a field are marked as “no match”.
Search and filter
The search box understands the same syntax as Data Manager: use a space to require multiple words, | when either value is acceptable, quotes for an exact phrase, and Field:value to search a single column. Right-click in the search box to insert a column name. Example: DN100|DN150 water finds rows with water and either DN100 or DN150. A list pasted from Excel is automatically turned into value|value.
Accept, or apply everything
Select one or more cells (or whole rows) and click Accept to move just those to “accepted” — the window stays open, and nothing is written yet. Click Apply all instead to accept and write everything in one go. Once at least one change has been accepted with Accept, the Apply (N) button appears — it writes only the accepted changes and closes the window.
Cancel or close
There’s no separate “Cancel” button. Close the window (the X at the top) to back out. If you’ve already accepted something with Accept, the dialog asks first: “Discard all accepted changes and close?” — so you don’t close it by mistake.
Right-click: zoom and copy
Right-click a row for Zoom to object, Copy row, or Search this column.
Zoom doesn’t open the drawing automatically. If the object belongs to a drawing that’s no longer open, the feature just shows a message asking you to open it manually first — it doesn’t switch drawings or reopen one for you.
There’s no “don’t show again” option in the preview window itself
The option to skip the review dialog isn’t a checkbox in the Sync Preview window itself. It’s controlled instead from Setup (the Skip sync preview dialog checkbox, step 6 above) or from the Show Sync Preview ribbon button.
Day-to-day synchronization
After sign-off, users can run the sync manually or let it happen automatically on open/save.
P3DBRIDGE_PREVIEWP3DBRIDGE_SYNCP3DBRIDGE_SYNCOPENP3DBRIDGE_CONFIGP3DBRIDGE_DATASOURCESP3DBRIDGE_TOGGLEPREVIEWData Bridge uses two configuration files: a shared/admin file (Plant3DDataBridge.json) and a user-specific file (Plant3DDataBridge.user.json). The plugin always writes to the user file; the admin file is read-only from the plugin’s side. The two are merged at sync time — data sources and configurations from both run together. Use Settings → Shared Admin Folder if the admin file should live in a shared folder instead of the default location under %APPDATA%\RKCadTools\DataBridge\Projects.
Test the setup on a project copy
Use a copy of the project for the first test. Check items off as you go; the checkmarks are only saved in this browser on this computer.
Quick troubleshooting
Preview shows no changes
Check that the configuration is Enabled, that the data source’s Scope and Classes cover the objects you expect, and that Table/View actually points to the right table/sheet. Then confirm the conditions (Equals against the right external column) actually match a row in the source.
A configuration runs in the wrong order
Lower Priority numbers run first. If two configurations share the same Priority, order is decided alphabetically by name. Give the configuration that should win last a higher number.
A property isn’t written
Check the mapping’s spelling and that the target field exists on the selected class. Acquired, inherited, calculated, read-only, and tag-format-controlled properties can’t be updated this way, regardless of what the mapping says.
Empty values overwrite existing data
Map empty values is on by default, so an empty external value actually clears the field. Turn the checkbox off in the configuration if an existing Plant 3D/AutoCAD value should be kept when the source is empty for that row.
Values disappear on objects with no match
This only happens if “If no match in external data” is set to Clear values. Switch to Do nothing if that’s not intended, and confirm the change in preview before syncing again.
Changes in Setup disappear, or the wrong file gets touched
The plugin always writes to the user-specific Plant3DDataBridge.user.json — never to the admin file. If the project is set up with a shared admin folder (Settings → Shared Admin Folder), remember the admin file’s contents can only be changed outside the plugin. A configuration file written by a newer version of the plugin is also rejected on load instead of being read incorrectly — update the plugin in that case.
Zoom to object does nothing
The drawing needs to already be open. The feature doesn’t open it automatically — it shows a message asking you to open the drawing manually if the object’s source drawing is no longer among the open documents.
Sync writes immediately without showing a preview
“Skip sync preview dialog” is turned on in Setup, or someone pressed the Show Sync Preview ribbon button. Toggle it in Setup again, or use P3DBRIDGE_TOGGLEPREVIEW to restore the review dialog.